Specifications
Home / Specs
LEED Documentation for Flannery Products:
If you require LEED documentation for your project you can submit our material content letters (linked below) or submit your LEED Forms to us and we will fill them out. You can e-mail [email protected] and our sales department will complete them and submit them back to you. Please keep in mind that Flannery's trims' material content fluctuates and will be closely monitored for any major changes.
LEED Information for Aluminum Extrusions:
Aluminum Extrusions Recycled Content Letter 2024
Aluminum Extrusions Material Safety Data Sheet (MSDS Report)
LEED Information for Steel Trims & Accessories:
Steel Trims & Accessories Recycled Content Letter
Steel Trims & Accessories Material Safety Data Sheet (MSDS Report)
LEED Information for Vinyl Trims & Accessories:
Vinyl Trims & Accessories Material Safety Data Sheet (MSDS Report)
Specification Sheet for Flannery's Aluminum Gypsum and Plaster Trims:
The link below will allow you to download and print Flannery's Specification Sheet for Extruded Aluminum Trims for use in a plaster or gypsum board assembly. Please be sure to reference individual product pages on this website for specific installation details and trim dimensions.
Flannery’s Manufacturer's Specifications
General Aluminum Trim Specifications
Cutting Aluminum Moldings
- Flannery recommends that full ten-foot lengths be used wherever possible.
- Aluminum Moldings can be cut with a chop saw, using a 150-tooth carbide-tip blade for non-ferrous metal. An abrasive cut-off wheel should not be used to cut aluminum trims.
- Lubricant (WD-40 or grease stick) must be applied to the blade before each cut. Lubricant should be cleaned off of trim prior to installation.
Field Painting
Mill Finish (raw) Aluminum Moldings
- Clean and treat moldings in accordance with the paint manufacturer’s specifications.
- Use a primer recommended by the paint manufacturer.
- Apply the paint coat according to the paint manufacturer’s specifications.
Chem-Film Finished Aluminum Moldings
- Clean and treat moldings in accordance with the paint manufacturer’s specifications.
- Use a primer recommended by the paint manufacturer.
- Apply the paint coat according to the paint manufacturer’s specifications.
Clear Anodized Aluminum Moldings
If field painting of clear anodized moldings is necessary, the following steps must be taken to improve the bond between the paint and the aluminum surface:
- Clean and treat moldings with an acid etch solution (i.e. mild concentration of muriatic acid), then rinse thoroughly and allow to dry. Depending on the paint manufacturer's recommendations, an “acid-etched” primer is also available.
- Use a primer recommended by the paint manufacturer.
- Apply the paint coat according to the paint manufacturer’s specifications.
- Flannery makes no guarantees, nor accepts any responsibility, for the performance of field-applied coatings over anodized finishes.
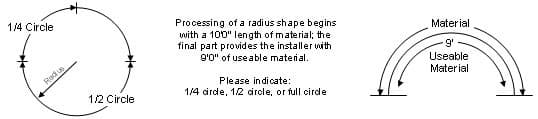
Factory Radius
Radius Shapes are factory curved or bent pieces of material that are necessary when a Flannery trim runs along a “curved” or “radiused” plane. Radiused material is bent to a project’s dimensional requirements and is considered a custom product. Here are some things you should consider when ordering radiused material:
-Radius Shapes are formed from 10’ pieces of material. Typically, only 9’ of that piece of material will be usable for installation due to machining marks.
-You can download and view all of our radius forms on our site
-Flannery accepts a template if a radius is complex or undefined by the architectural plans.
-When placing an order for radius with Flannery, please indicate the following:
- Product Type (i.e. product code) and Finish Required
- Direction of Bend (Inside Curve, Outside Curve, Arch, or Reverse Arch)
- Size of Radius (in inches or feet)
- Point of Measurement (the point on the trim where the radius is measured to)
- Quantity of Pieces Required
Specifications for Interior Aluminum Drywall Trims
Installation Instructions for Interior Moldings with Tapeable Flanges
- Moldings with tapeable flanges are to be installed after the drywall/gypsum board has been installed. The installer must provide space for the moldings at the time of drywall/gypsum board installation or cut the drywall/gypsum board with a router.
- The framing should provide a backer so that moldings can be attached with #6 drywall screws 16” on center.
- Before the taping process begins, installation flanges should be cleaned. If veneer plaster is specified, the installation flanges must be treated with a bonding agent. Reveals should be masked to prevent compound joint, drywall mud or texture overspray from entering the reveal opening.
- Painted aluminum moldings should be masked with vinyl tape. Use cloth or vinyl tape specifically manufactured for masking anodized aluminum trims.
- Drywall tape should not overlap the edge of the reveal. An 8” wide trowel should be used to apply the final skim coat.
- Fiberglass or self-adhesive drywall tape will shorten taping time and assist in the prevention of possible cracking.
Installation Instructions for Interior Moldings without Tapeable Flanges
- Moldings without tapeable flanges are to be installed prior to the drywall/gypsum board being installed.
- The framing should provide a backer so that moldings can be attached with #6 drywall screws 16” on center.
- Reveals should be masked to prevent compound joint, drywall mud or texture overspray from entering the reveal opening.
Aluminum Alignment Splices for Interior Trims

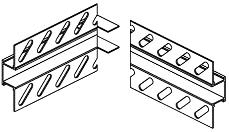
Almost all of Flannery’s Drywall Trims are now available with our exclusive Aluminum Alignment Splices. Flannery offers our Straight Splices free of charge and our Special Corner or 90º Intersection splices for a small charge. Straight Splices assist the installer in aligning and joining aluminum drywall trims together along a straight plane. Installers who cut their own miters in the field can use our Special Corner and 90º Intersection Splices to bring the cut pieces together for a tight and clean butt or miter joint.
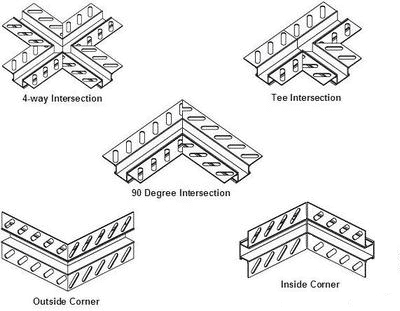
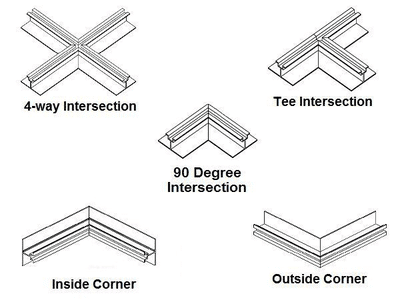
Prefabricated Factory Intersections for Interior Trims
Flannery’s prefabricated factory intersections and corners for interior trims are manufactured with the same or different moldings. They are used to complete intricate building designs that utilize intersecting lines (both vertical and horizontal) around interior walls. The intersections and corners are mitered and then heli-arc welded at the installation flanges. The standard intersection or corner comes with 6” legs from the center point of the reveal. Custom leg lengths are also available.
Specifications for Strata Ceiling Trims
Aluminum Alloy and Composition
Flannery’s Aluminum Strata Cloud Ceiling Trims are standard extruded aluminum alloy 6063 T5 and have a typical .050” or greater nominal wall thickness. Extruded Aluminum Ceiling Trims are aesthetic trims that are not intended to hold or support the full weight of any panel or gypsum board system. Strata Cloud Trims meet or exceed ASTM B221 for extruded aluminum products.
Aluminum Strata Cloud Ceiling Trims come in 10' lengths and shall have a standard stock finish of Mill Finish (for field priming & painting) or a “Cloud White” factory applied Kynar® paint finish. Other factory finishes are available, including liquid or powder-coated paint, Chem-Film, Primer, and Anodizing finishes.
Kynar® Paint Finish
The standard stock finish for Flannery’s Strata Cloud trims is our “Cloud White” color which is a factory applied Kynar® paint. Kynar® is a 70% fluropolymer resin based 2-coat baked on paint that is offered by Flannery and can be used where high durability is needed or an existing color must be matched. Kynar® finishes are highly resistant to chalking and ultraviolet deterioration. They are also highly resistant to chemicals, salt spray, and industrial pollutants.
Flannery recommends these finishes for trims on exteriors in harsh environments including coastal areas where salt air is most common. Kynar® paint finishes are available in custom colors. Please note that some finishes will require a Kynar® XL (with topcoat) finish due to the exotic nature of the color. Please have the color code or sample available when requesting a quote for these custom colors.
Kynar® Paint Finishes shall meet or exceed AAMA 605.2 Specification “Voluntary Specification for High Performance Organic Coatings on Architectural Extrusion Panels.” Meets or exceeds a nominal dry film thickness of 1.2 mil. (Kynar® is a registered trademark of Atochem North America, Inc).
Installation Instructions for Suspended Ceiling Grid
- Flannery recommends that any installer of Strata Cloud Ceiling Trims properly layout and coordinate the installation of trims along with the ceiling grid and hanger wires that will be utilized in the installation of the suspended ceiling.
- The suspended ceiling grid and hanger manufacturer should be consulted prior to the installation of the grid, trim, ceiling tiles, or gypsum board for load and seismic limitations or requirements.
- Flannery’s Strata Cloud Ceiling Trims are installed utilizing the hardware provided by Flannery and additional hardware is available for purchase if needed.
- Do not overtighten the hardware screws when installing the trim in order to prevent the deforming or release of the trim from the Ceiling Cloud Grid Clips or Ceiling Cloud Trim Splices.
- Please visit each individual Strata part page to get more installation instructions for specific parts.
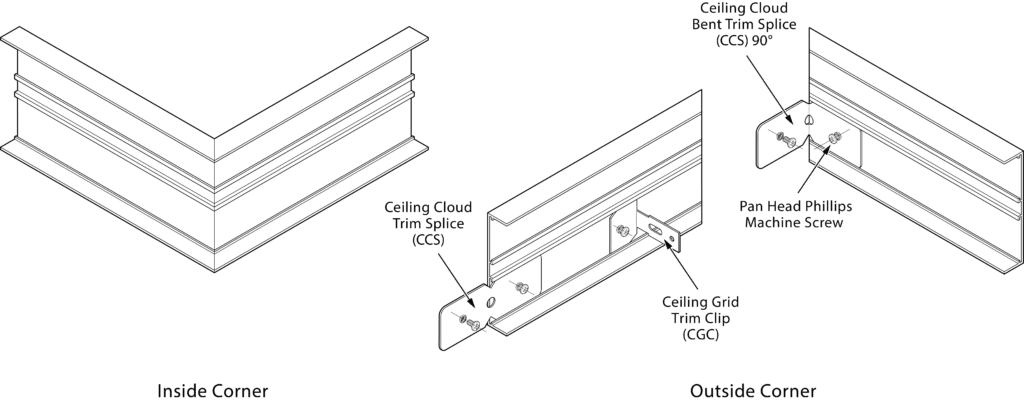
Strata Ceiling Grid Clips and Ceiling Cloud Trim Splices
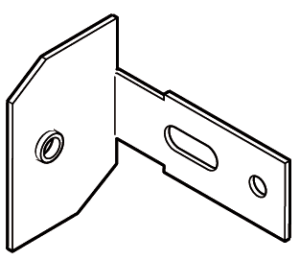
Flannery provides Ceiling Grid Trim Clips (CGC) and Ceiling Cloud Trim Splices (CCS) for all of our Strata Ceiling Trims. We have a 90-degree Splice and a 45-degree Grid Clip as well.
Our Grid Clips can be easily inserted into the built-in slots on the back of our trims and then tightened into place with the lock screw provided. The clip and trim are then attached to the ceiling grid with an approved fastener. Each ten-foot piece of trim comes with either six or twelve Ceiling Grid Trim Clips depending on the size of the trim and/or its function. Additional Ceiling Grid Trim Clips can be purchased separately.
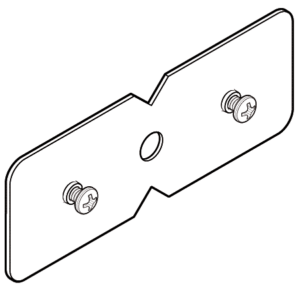
And Flannery's Ceiling Cloud Trim Splices ensure a level and tight butt joint between two pieces of Strata Cloud Ceiling trims. Each Splice comes with two lock screws so that each trim is locked to the other. Each ten-foot piece of trim comes with either two or four Ceiling Cloud Trim Splices depending on the size of the trim and/or its function. Additional Ceiling Cloud Trim Splices can be purchased separately.
Prefabricated Factory Corners for Strata Trims
Flannery offers prefabricated Inside and Outside Corners for intricate ceiling designs for all our Strata Ceiling Trims. Prefabricated corners are factory mitered and then welded together to prevent separation during the installation of the edge trim. Factory welded corners come with 8” legs in each direction, however, custom leg lengths can be ordered. The corners are painted to match the straight pieces of Strata Trim for a perfect cloud aesthetic. Each Factory Corner comes with two Ceiling Grid Clips and two Trim Splices to assist the installer.
.
Specifications for Aluminum Exterior Plaster & Stucco Trims
Installation Instructions for Exterior Reveal Moldings Installed Vertically
- Building Paper must be placed behind all moldings and have a shiplap of 6”.
- Attach moldings 16” on center to framing using approved fastening methods. Butt joints must be cut accurately and sealed.
- Install lath over installation flanges of all moldings.
- Mask all reveals prior to plastering. Use cloth or vinyl tape specifically manufactured for masking anodized aluminum moldings. For painted moldings, use vinyl tape.
Installation Instructions for Exterior Reveal Moldings Installed Horizontally
- Building paper must be placed behind all moldings and have a shiplap of at least 2”.
- Attach moldings 16” or 24” on center to framing using approved fastening methods. Butt joints must be cut accurately and sealed.
- Install lath over installation flanges of all moldings.
- Mask all reveals prior to plastering. Use cloth or vinyl tape specifically manufactured for masking anodized aluminum moldings. For painted moldings, use vinyl tape.
Installation Instructions for Exterior Reveal Moldings Over Metal Lath
- Molding selection must be in accordance with the proper plaster thickness specified.
- Moldings must be tied to the lath with tie wire, thus protecting the waterproof membrane. Flannery offers factory punched stucco “key” holes along the reveal attachment flanges to assist in tying the trim to the metal lath or wire. Butt joints must be cut accurately and sealed.
- All installation flanges of the moldings must be covered with lath.
- Please note that the Uniform Building Code requires two layers of grade “D” paper when applied over wood-based sheathing.
- Mask all reveals prior to plastering. Use cloth or vinyl tape specifically manufactured for masking anodized aluminum moldings. For painted moldings, use vinyl tape.
Installation Instructions for Weep, Window, and Soffit Drip Screeds
Weep Screeds, Door & Window Drips or Soffit Drip Screeds should be installed per the architect or building engineer’s installation instructions. Flannery recommends the following steps to help assist the installer in maximizing these trims’ main purpose, which is water management:
- Before Flannery’s weeping trims are installed, required waterproofing for door and window openings should be inspected and evaluated for proper installation.
- All Weep or Drip Screeds should be attached horizontally 16” or 24” on center to framing using approved fastening methods. Butt joints must be cut accurately and sealed.
- Building paper or the weather resistant barrier should then be installed over the corresponding attachment flanges to prevent moisture from getting in behind the trim.
- Install lath over the corresponding attachment flanges of the molding.
- If the trim has a reveal, use cloth or vinyl tape specifically manufactured for masking anodized aluminum moldings prior to plastering. For painted moldings, use vinyl tape.
Alignment Splices & Connector Clips For Exterior Aluminum Trims
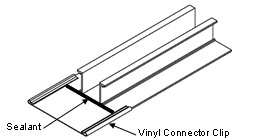
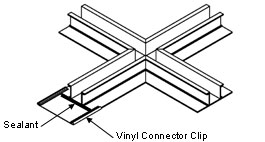
Vinyl Connector Clips
Flannery provides Vinyl Connector Clips for many of our exterior aluminum trims to assist the installer in lining up and sealing butt joints. Sealant is required at all butt joints and Flannery’s Vinyl Connector Clips can be utilized as a bed for the sealant to be applied between two pieces of trim. Vinyl Connector Clips are required for Flannery’s Plaster Channel Screeds and are provided free of charge.
Aluminum Alignment Splices
Almost all of Flannery’s Drywall Trims are now available with our exclusive Aluminum Alignment Splices. Flannery offers our Straight Splices free of charge and our Special Corner or 90º Intersection splices for a small charge. Straight Splices assist the installer in aligning and joining aluminum drywall trims together along a straight plane. Installers who cut their own miters in the field can use our Special Corner and 90º Intersection Splices to bring the cut pieces together for a tight and clean butt or miter joint.
Prefabricated Factory Intersections For Exterior Trims
Flannery’s prefabricated factory intersections and corners for exterior trims are manufactured with the same or different moldings. They are used to complete intricate building designs that utilize intersecting lines (both vertical and horizontal) around interior or exterior walls. The intersections and corners are mitered and then heli-arc welded at the installation flanges. A seal is then applied to the back of the intersecting butt joints. The standard intersection or corner comes with 6” legs from the center point of the reveal. Custom leg lengths are also available. All installation flanges must be covered with lath and all butt joints must be sealed.
Specifications for Soffit Ventilation
It is possible to punch Vent Slots into many of Flannery’s Trims, thus providing the needed ventilation for any project. All Vent Slots are ⅛” wide and 1” long. Vent Slots are configured at 1½” on center lengthwise and ½” on center laterally. Each row of Vent Slots lengthwise provides approximately one-square inch of vented area per lineal foot (see Vent Area Graph below). All of Flannery’s Vented Trims are available with a charcoal fiberglass bug screen to prevent insects from entering the soffit area through the vent slots. Bug screen is available upon request at an additional cost.
Flannery manufactures ventilated trims for a number of soffit systems including, Plaster, EIFS, Exterior Gypsum Board and Wood Paneling. Attach Vent Screeds to the framing with nails, screws, or other approved fastening methods. To ease installation, Flannery offers Aluminum Alignment Splices for most of its Vent Screeds. All Vent Screeds must be cut accurately and installed with tight, neat joints. Please specify Flannery Product Code along with the phrase “with Vent” (i.e. “PCS 75-200 with Vent”) when ordering Vent Screeds.
Vent Area Graph
| Reveal Width | Vent Slots Per Row | Approximate Area Per Lineal Foot (Approximate) |
| 1/2" | 1 | 1" sq. |
| 5/8" | 1 | 1" sq. |
| 3/4" | 1 | 1" sq. |
| 7/8" | 1 | 1" sq. |
| 1" | 1 | 1" sq. |
| 1 1/2" | 2 | 2" sq. |
| 2" | 3 | 3" sq. |
| 2 1/2" | 3 | 3" sq. |
| 3" | 5 | 5" sq. |
| 4" | 7 | 7" sq. |
| 6" | 9 | 9" sq. |
Specifications for Aluminum Panel Trims
Panel Trim Alloy and Composition
Flannery's Panel Trims are standard extruded aluminum alloy 6063 T5 and have a typical .050'' nominal wall thickness. They can be used in Fiber Cement, Composite Siding, and Millwork systems interchangeably, but our product codes indicate the trim's primary design purpose ("C" for Cement Panel, "S" for composite Siding, "W" for wood Panel or Millwork). Aluminum Panel Trims are aesthetic trims and are not intended to hold or support the weight of any panel system. Please consult a structural engineer when considering the use of Flannery's Furring Strips or Z-Fur Strips in a rain screen system.
Interior Usage of Panel Trims
Flannery recommends that any installer of Aluminum Panel Trims properly layout and coordinate the installation of trims along with the particular paneling that will be utilized in a given installation. Proper planning will reduce installation time and produce the desired aesthetic.
Exterior Usage of Panel Trims
It is important for the installer to be aware of certain restrictions when installing Aluminum Panel Trims on an exterior wall. Certain trims are designed specifically for vertical or horizontal installation to allow for the proper movement of moisture around the paneling. Trim installed improperly could lead to moisture intrusion or a poor wall design. Please refer to each individual product page for a more comprehensive guide to exterior panel trims.
Installing Panel Trims
Installing Vertically
- A weather-resistant barrier must be placed behind all moldings and have a shiplap of 6''.
- Attach moldings 16'' on center to framing using approved fastening methods.
- Butt joints must be cut accurately and sealed.
- See individual product pages for more details.
Installing Horizontally
- A weather-resistant barrier must be placed behind all moldings and have a shiplap of 2''.
- Flashing tape may be required over the upper attachment flange of trims running horizontally as an avenue for moisture to flow out behind the system.
- Attach moldings 16'' or 24'' on center to the framing using approved fastening methods.
- Butt joints must be cut accurately and sealed.
- See individual product pages for more details.
Specifications for Brake Shapes
Flannery manufactures a number of press brake trims in many different metals and finishes. Brake Shapes are typically custom items due to the many variables in flange or reveal dimensions and variety of metals that Flannery offers. Most of Flannery’s Brake Shapes can be produced within 3-5 days of order placement and trim costs are based on current metal and production costs. Custom shapes can be requested by simply submitting a drawing with dimensional information to Flannery.
Product Data for Metal Sheets used in Typical Brake Shape Production:
| Metal | Thickness | Finish | Product Code |
| Clear Anodized Aluminum Sheet |
.040" | Clear Anodized | CA |
| Mill Finish Aluminum Sheet |
.040" | Mill | AL |
| 16 oz. Copper Sheet |
26 ga. | Mill | CU |
| Stainless Steel T-304 #2 Mill Sheet |
26 ga. | Mill | SS |
| Stainless Steel T-304 #4 Mill Sheet |
26 ga. | Brushed | BS |
| Galvanized Steel Sheet (G60 or Greater) | 26 ga. | Galvanized | GS |
*Other Sheet Thicknesses and Finishes are available upon request.