Drywall Trim
Showing all 37 results
-

Drywall Reveal
Read more -

Drywall Shadow Mold
Read more -
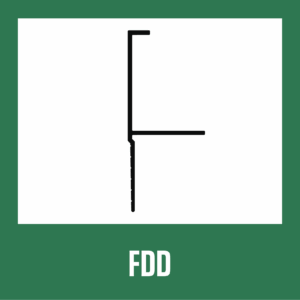
Drywall F-Mold
Read more -
Drywall V-Reveals
Read more -
Drywall Key Edge
Read more -
Drywall Acoustical Reveal
Read more -
Drywall Flush Transition
Read more -
Drywall Ceiling Trim
Read more -
Flush Base Mold
Read more -
Flush Base Reveal
Read more -
Drywall Protrusion Edge Reveal
Read more -
Drywall Protrusion Mold
Read more -
Drywall Protrusion Edge Corner
Read more -
Drywall Protrusion Edge Trim
Read more -
Wall Covering J-Mold
Read more -
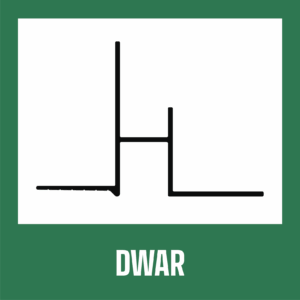
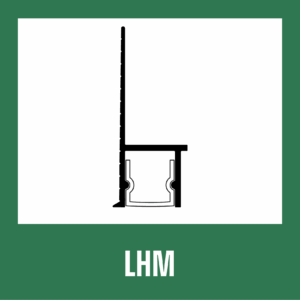
Wall Covering H-Mold
Read more -
Wall Covering Outside Corner
Read more -
Wall Covering Transition Corner
Read more -
Fabric Outside Corner
Read more -
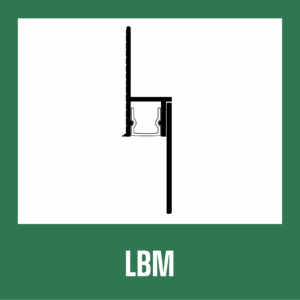
Drywall L-Metal
Read more -
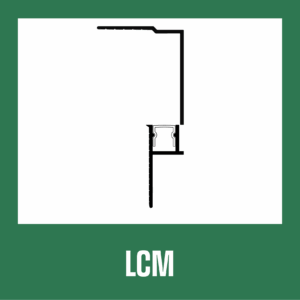
Drywall Reverse L-Metal
Read more -
Drywall Outside Corner
Read more -
Drywall Corner Reveal
Read more -
W-Transition Mold
Read more -
Drywall T-Mold
Read more -
Veneer Plaster J-Mold
Read more -
Drywall Glazing Track
Read more -
Drywall End Enclosure
Read more -
Flush Edge Wall Cap
Read more -
Beveled Drywall Corner
Read more -
Concealed Fastener Trim
Read more -
LED Drywall Reveal
Read more -
LED Drywall F-Mold
Read more -
LED Drywall Housing Mold
Read more -
LED Base Molding
Read more -
LED Ceiling Mold
Read more -
LED Drywall Pocket Trim
Read more


Choosing the Right Drywall Trim for Your Project
Flannery’s main categories for Aluminum Drywall Trims have always been Reveals, Transitions, and Corners. But over the last few years, we have added LED-compatible trims, Wall Covering Trims, and Protrusion Trims. Below, you will find descriptions of all of our Aluminum Drywall Trims and their distinctions.
Drywall Reveal Trims
Drywall Reveal: Our standard Drywall Reveal creates an aesthetic division between drywall panels on vertical walls and ceilings. Drywall Reveals can create horizontal or vertical lines and easily intersect where desired.
Drywall V-Reveals: Create an aesthetic division between drywall panels on vertical walls and ceilings. Drywall V-Reveals can be used to create horizontal or vertical lines and can cleanly intersect where desired. V-Reveals have a unique angle appearance once installed compared to most drywall reveals’ typical “square” look.
Drywall Ceiling Trim: Creates an aesthetic reveal between vertical walls and ceilings utilizing drywall. Drywall Ceiling Trims terminate drywall at the top of vertical walls attached to the wall and the ceiling.
Drywall Transition Trims
Drywall F-Mold: Create an aesthetic division between drywall and dissimilar materials, including door and window frames, ceilings, and floors. Drywall F-Molds can terminate drywall at the top or bottom of vertical walls. It is also compatible with gypsum board ceilings.
Drywall Shadow Mold: (or Z-Metals) Create an aesthetic reveal between drywall and dissimilar materials, including door and window frames, ceilings, and floors. Builders can use Shadow Molds to terminate drywall at the top or bottom of vertical walls and act as a reveal base. Additionally, Shadow Molds can be inserted into Kerf slots along door and window frames.
Drywall L-Metal: Create a termination to drywall wherever it may finish against a dissimilar material. Drywall L-Metals cover the unfinished edge of drywall to allow for a smooth and clean transition from drywall to drywall or drywall to another material, notably around inset doors and windows, to create an “aluminum sill.”
Reverse L-Metal: Terminate drywall wherever it may finish against a perpendicular plane that may not allow the joint compound to be applied. Reverse L-Metals cover the unfinished edge of drywall to allow for a smooth and clean transition from drywall to drywall or drywall to another material, notably where a drywall ceiling transitions to a vertical wall with wallpaper or paneling.
W-Transition Mold: Allows for transitions between vertical walls and ceilings. It can also form a reveal between a wall and a suspended ceiling. Many W-Transition Molds can also be ventilated to allow airflow into a recessed soffit.
Drywall T-Mold: A base-of-wall trim that allows the installer to attach it to the framing before the gypsum board installation without losing the advantage of being able to tape and mud the trim to the drywall. Drywall T-Molds create the same aesthetic reveal between drywall and dissimilar materials that an Aluminum Drywall Shadow Mold would, with the advantage of first setting the trim in place.
Veneer Plaster J-Mold: An edge trim that allows the installer to attach it to the framing before the gypsum board installation without losing the advantage of being able to tape and mud the trim to the drywall. Most commonly known as “Drywall J-Bead,” the Veneer Plaster J-Mold offers an even greater level of a joint compound than typical drywall trims provide. This additional bevel to the taping flange allows for the application of the veneer plaster for a clean and crisp edge to the wall system.
Drywall Glazing Track: Helps terminate or frame a window within an interior partition wall or cased openings. Glazing Tracks are used in conjunction with a piece of rubber (provided by theirs) to allow for the installation of a piece of glass. Glazing Tracks completely encapsulate a stud and two layers of gypsum board.
Drywall End Enclosure: Help terminate walls, partitions, or cased openings. Our End Enclosures can also cap the edges of “door-less” wall openings or where a wall might terminate against a window. End Enclosures completely encapsulate a stud and two layers of gypsum board.
Drywall Corners
Drywall Outside Corner: A high-strength alternative to galvanized or plastic square cornerbead. Its thickness allows it to be utilized in high-traffic areas where outside drywall corners may require additional protection than the conventional corner bead.
Drywall Reveal Corners: An aluminum trim for the outside corners of the drywall. The Drywall Corner Reveal creates a “stepped” reveal where two drywall walls meet. Once drywall mud and tape are applied to the attachment flanges, the outside corner looks like a reveal instead of the conventional sharp corner bead look.
Beveled Drywall Corner: A unique outside corner trim that provides a sturdy and aesthetic corner effect, builders can use the “chamfered” or “flat-nosed” Beveled Drywall Corner with any drywall thickness.
Drywall Wall Covering Trims
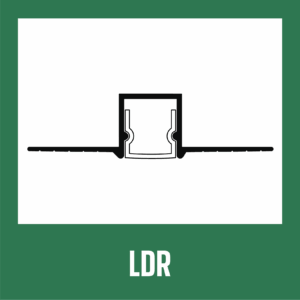
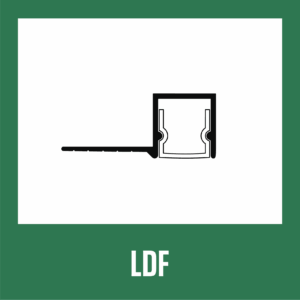
Wall Covering J-Mold: A termination trim for FRP (Fiberglass Reinforced Plastic) panels or wall coverings that are installed over a new or existing gypsum board. The J-Mold can be used around doors and windows to encapsulate wall coverings or terminate them against a dissimilar material. The Wall Covering J-Mold has a tapeable flange to be finished to the drywall cleanly, and the wall covering material can be applied smoothly, so the result looks great.
Wall Covering H-Mold: A trim for FRP (Fiberglass Reinforced Plastic) panels or wall coverings will be installed over a new or existing gypsum board, creating a “flat-face” reveal between two adjoining panels. The H-Mold can cover or conceal joints between FRP panels or wall coverings that need a clean joint and offer a put-together look.
Wall Covering Outside Corner: An outside corner trim for FRP (Fiberglass Reinforced Plastic) panels or wall coverings to be installed over a new or existing gypsum board. The Outside Corner is utilized at 90-degree corners where a wall covering will run along two adjoining walls. The Wall Covering Outside Corner also has tapeable flanges so that it will be finished to drywall cleanly, and the wall covering material can be applied smoothly so the result looks great.
Drywall Protrusion Trims
Drywall Protrusion Edge Reveal: Create an aesthetic division between drywall panels on vertical walls and ceilings. As the name suggests, our Drywall Protrusion Edge Reveal also has a protruding decorative reveal at the edges of the trim “face.” Drywall Protrusion Edge Reveals create clean horizontal or vertical lines.
Drywall Protrusion Edge Corner: An aluminum trim for the outside corners of drywall and has a protruding decorative reveal. The Protrusion Edge Corner creates a “stepped” reveal where two drywall walls meet. Once drywall mud and tape are applied to the attachment flanges, the Edge Corner appears as a decorative reveal at an outside corner instead of the conventional sharp corner bead look.
Drywall Protrusion Edge: Creates a termination to drywall and has a protruding decorative reveal that sits at the edge of the trim. Protrusion Edge Trims cover the unfinished edge of drywall to allow for a smooth and clean transition to an inset window or door.
Drywall Protrusion Mold: a surface-mounted trim that can be used on any flat gypsum board surface. As the name suggests, our Drywall Protrusion Mold also has a protruding decorative reveal that sits at the edge of the trim “face” to create clean horizontal or vertical lines.
LED Drywall Trims
LED Drywall Reveal: Creates a linear light reveal between drywall panels on vertical walls or ceilings. The LED Drywall Reveal can be installed with either ½” or 5/8″ thick gypsum board and has thinning mud flanges to allow the installer to finish it to drywall. Flannery’s LED Drywall Reveal comes with a frosted diffuser and provides a ½” wide or smaller LED strip to be applied to the aluminum reveal (LEDs and wiring not provided).
LED Drywall F-Mold: This creates a linear light reveal between drywall and dissimilar materials, including door and window frames, ceilings, and floors (these could be an excellent option for LED baseboards). LED Drywall F-Molds can terminate drywall at the top or bottom of vertical walls and with gypsum board ceilings. The LED Drywall F-Mold can be installed with either ½” or 5/8″ thick gypsum board and has thinning mud flanges to allow the installer to finish it to drywall. Flannery’s LED Drywall F-Mold comes with a frosted diffuser and provides a ½” wide or smaller LED strip to be applied to the aluminum reveal (LEDs and wiring are not provided).
LED Drywall Housing Mold: Flannery’s LED Drywall Housing Mold creates a linear light reveal at the top, bottom, or edge of a gypsum wall or ceiling. The Housing Mold is installed with a 5/8″ thick gypsum board and allows inserting a ½” wide LED strip along the edge of any drywall plane to create an aesthetic light cove solution. Flannery’s LED Housing Mold also comes with a frosted diffuser to snap in overtop the LED and wiring (LEDs and wiring not provided as we want our customers to be able to choose what lighting system they want).
LED Base Molding: Creates a linear light reveal at the bottom of a vertical gypsum wall. The LED Drywall Base Mold is installed with 5/8″ thick gypsum board and is available in varying heights. Flannery’s LED Drywall Base Mold comes with a frosted diffuser and allows for a ½” wide or smaller LED strip to be applied to the reveal’s side wall (LED’s and wiring are not provided).
LED Ceiling Mold: This creates a linear light reveal at the top of a vertical gypsum wall where it meets a gypsum board ceiling. The LED Ceiling Trim is installed with 5/8″ thick gypsum board and is available in varying heights. Flannery’s LED Drywall Ceiling Trim comes with a frosted diffuser and allows for a ½” wide or smaller LED strip to be applied to the reveal’s side wall (LED’s and wiring are not provided).
LED Drywall Pocket Trim: A drywall trim that creates a small pocket in a wall or ceiling for an LED light strip installation. The LED Drywall Pocket Trim hides the LED light strip from direct view and creates a pocket or return in a gypsum wall or ceiling and can be combined with a flat strip of aluminum or other metal to create a reflective light effect (LEDs and wiring not provided).